
Most of the video the project works with shows one operation: a laparoscopic cholecystectomy, the removal of the gallbladder through a few small incisions. You do not need medical training to write code, test tools or check annotations here, but it helps to know what you are looking at. This page shows the operation in seven short animated clips, about a minute and a half in all. The clips have no sound; the explanations are in the captions and in the text beside each clip.
Read this first
- The animation is synthetic. The project drew it in Blender from simple shapes (the script). No surgical video, dataset frame or patient scan was used. Shapes, colours and proportions are simplified so that each step can be seen.
- Real video is harder to read. It is wetter and darker, the fat is not a tidy yellow layer, smoke and blood get in the way, and the anatomy differs from patient to patient. A real operation takes tens of minutes, not ninety seconds.
- This is orientation, not medicine. The page helps contributors understand the data. It is not advice for patients and not teaching material for surgeons.
- It has not been reviewed yet. The anatomy, the order of the steps and every explanation below wait for the Clinical Lead’s review. Where this page disagrees with the annotation guideline or the instructions in your CVAT task, they take precedence.
The operation in brief
The gallbladder is a small pear-shaped sac under the liver. It stores bile, a fluid the liver makes to help digest fat. The usual reason to remove it is gallstones that cause pain or inflammation. A person lives normally without a gallbladder: bile then flows from the liver straight to the intestine.
In laparoscopic (“keyhole”) surgery the abdomen is filled with carbon dioxide to make room to work. A camera on a rod, the laparoscope, and long thin instruments pass through sleeves in the abdominal wall called trocars or ports, usually four of them. The surgeon operates while watching the camera’s picture on a monitor. That picture is the video the project’s models learn from.
Two things connect the gallbladder to the rest of the body: the cystic duct, which carries bile, and the cystic artery, which brings blood. Both have to be closed and cut. Close by, hidden in fat, runs the common bile duct, which drains the liver and must not be harmed. So the centre of the operation is not the cutting. It is the slow work before it: clearing the fat away until the surgeon is certain which structure is which.
What is in view
The still below is the moment just before the clips are placed, with the main structures numbered. The picture is the way the camera sees it: the patient’s right side is on the left of the image.
- Liver. Large, smooth, red-brown. The gallbladder is attached to its underside.
- Fundus. The rounded top of the gallbladder. A grasper holds it here to lift the liver.
- Body. The main part of the gallbladder. It lies against the liver in its bed.
- Infundibulum. The narrow end, also called the neck; its bulge is Hartmann's pouch. The second grasper pulls here.
- Cystic duct. The pale tube from the neck. It carries bile.
- Cystic artery. Thinner and red. It brings blood to the gallbladder.
- Hepatocystic triangle. Also called Calot's triangle: the area between the gallbladder, the liver and the bile duct. Fat fills it until it is dissected.
- Hepatoduodenal ligament. A fold of fatty tissue. The common bile duct runs inside it, out of sight, and it is left closed.
- Duodenum. The first part of the small intestine: pink and smooth.
- Omentum. An apron of yellow fat that covers the intestine.
The seven phases
Researchers split the operation into seven phases, first in the Cholec80 dataset, and the project uses the same split. The names are dataset labels, not textbook terms. Each clip below plays one phase. Captions are on by default; the player’s menu turns them off.
The order is the usual one, not a fixed one. The last three phases in particular change places: a surgeon may stop a bleeding point before the gallbladder goes into the bag, or come back to clean after it is out.
Phase 1. Preparation
- What happens: the surgeon opens up the working area. One grasper takes the fundus and pushes it up over the liver, which lifts the liver and unfolds what lay under it. A second grasper takes the neck and pulls it to the side, which spreads the hepatocystic triangle.
- In a real video: the phase starts when the camera enters the abdomen. It can include a look around, the other ports coming in, and the release of adhesions, bands of scar tissue that stick the gallbladder to its neighbours.
- Instruments: two graspers.
- Worth knowing: the two graspers hold the gallbladder for most of the operation and hardly move. They are still instruments in the frame.
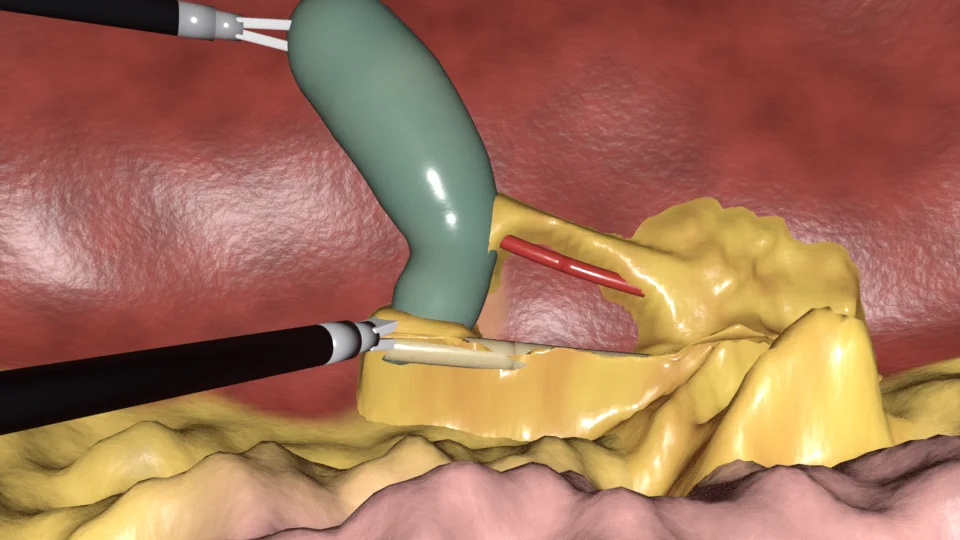
Phase 2. Calot triangle dissection
- What happens: the surgeon removes fat and connective tissue from the triangle, one thin layer at a time, until the cystic duct and the cystic artery stand bare. The lower part of the gallbladder is lifted off the liver as well.
- The goal: the critical view of safety. It has three conditions: the triangle is cleared of fat and fibrous tissue; the lower third of the gallbladder is separated from the liver; and two structures, and only two, are seen entering the gallbladder. Only then is it safe to clip and cut.
- In a real video: this is usually the longest phase. The tissue comes away in shreds, not in neat patches, and small vessels bleed.
- Instruments: the L-hook, with the two graspers holding. Some surgeons dissect with a grasper or a curved dissector.
- Worth knowing: the duct and the artery are under fat at the start and come into view bit by bit. Early in the phase nobody can point at them yet, the surgeon included.
Phase 3. Clipping and cutting
- What happens: the clip applier closes metal clips on the cystic duct and on the cystic artery, and scissors cut each of them between the clips. In the animation two clips stay on the patient’s side of each structure and one leaves with the gallbladder; the number differs between surgeons.
- Afterwards: the gallbladder is attached only to its bed on the liver.
- Instruments: the clip applier, then scissors.
- Worth knowing: these two instruments are in view for well under a minute in most operations, so they are rare in the data and models find them hard. The clips themselves stay in view until the end.
Phase 4. Gallbladder dissection
- What happens: the hook separates the gallbladder from the liver, working from the neck towards the fundus, while a grasper keeps the layer between them stretched. What is left on the liver is the gallbladder bed: a raw, rougher, paler patch.
- In a real video: the electric current makes smoke that can hide the whole picture for seconds. If the gallbladder wall is opened, bile or stones spill out.
- Instruments: the L-hook and a grasper.
- Worth knowing: the bed is liver, but it no longer looks like the smooth liver surface around it.
Phase 5. Gallbladder packaging
- What happens: a specimen bag comes in through a port and opens, a grasper puts the freed gallbladder inside, and the bag is drawn closed.
- Why: the bag keeps bile and stones from spilling and protects the incision the gallbladder will leave through.
- Instruments: the specimen bag and a grasper.
- Worth knowing: the bag is a thin clear or white film, and the gallbladder shows through it.
Phase 6. Cleaning and coagulation
- What happens: the surgeon inspects the gallbladder bed and the clipped stumps. The suction-irrigator rinses the area with fluid and sucks away blood and bile, and a bleeding point is sealed with electric current. The animation shows the suction and one coagulation; it does not show the rinsing.
- Instruments: the suction-irrigator and the bipolar forceps; some surgeons coagulate with the hook.
- Worth knowing: blood looks different as a fresh trickle, as a pool, diluted in rinsing fluid and as a dark coagulated spot.
Phase 7. Gallbladder retraction
- What happens: a grasper takes the bag by its rim and pulls it out of the abdomen through one of the ports. “Retraction” is the dataset’s word for taking the gallbladder out. After a last look the instruments are removed, the gas is released and the incisions are closed.
- Instruments: a grasper and the specimen bag.
- Worth knowing: at the end the camera itself is pulled out, and a recording can run on outside the body, where it may show the operating room and people. The de-identification pipeline removes such frames. If one ever reaches your task, do not annotate it: tell the administrator.
Words you will meet
- Bile: the yellow-green fluid the liver makes; the gallbladder stores it.
- Calot’s triangle, hepatocystic triangle: the area between the gallbladder, the liver and the bile duct where the cystic duct and artery are found.
- Clip: a small metal or plastic clamp that closes a duct or a vessel for good.
- Coagulation: sealing tissue or a vessel with heat from electric current. Monopolar current runs from one tip, as in the L-hook; bipolar current runs between two jaws.
- Common bile duct: the main duct from the liver to the intestine. The cystic duct joins it. It is not cut in this operation.
- Critical view of safety: the picture the surgeon must reach before clipping, described under phase 2.
- Dissection: separating tissues from each other, by cutting, burning or pushing them apart.
- Gallbladder bed: the patch of liver the gallbladder was attached to.
- Laparoscope: the camera on a rod. The view may be angled, and the surgeon’s assistant moves it.
- Pneumoperitoneum: the gas that fills the abdomen during the operation.
- Stump: the closed end of a duct or a vessel that stays in the body after the cut.
- Trocar, port: a sleeve through the abdominal wall that lets an instrument or the camera in and keeps the gas from escaping.
Where this comes from
- The seven phases and the seven instruments: Twinanda et al., EndoNet: A Deep Architecture for Recognition Tasks on Laparoscopic Videos, IEEE Transactions on Medical Imaging, 2017, which introduced the Cholec80 dataset.
- The critical view of safety: Strasberg, Hertl and Soper, An analysis of the problem of biliary injury during laparoscopic cholecystectomy, Journal of the American College of Surgeons, 1995; Strasberg and Brunt, Rationale and use of the critical view of safety in laparoscopic cholecystectomy, the same journal, 2010.
Open questions for the Clinical Lead
- Whether the simplified anatomy is acceptable for orientation: one common arrangement of the cystic duct and artery, no anatomical variants, and the common bile duct kept out of sight.
- Whether the three conditions of the critical view of safety are worded correctly for a lay reader.
- Whether the phase boundaries described here match the rules the project uses to label phases.
- The clip count shown, and whether the animation should also show irrigation, smoke and a bile leak.
About the animation
The clips and the still come from scripts/blender/cholecystectomy.py in the website repository and are published under CC BY 4.0, like the site’s other illustrations. The instruments are the models of the instrument guide.
Next: the instrument guide. Back to annotation in CVAT.